
Trying to figure out how to lace your Hey Dude shoes the right way can be unclear. This guide will help you through the process step by step. With a little bit of practice, you’ll have them laced up perfectly in no time!
When it comes to fashion, there are a few classic looks that will never go out of style. One of these is the lace-up shoe. If you want to add a touch of sophistication to your look, a pair of lace-up shoes is the way to go. But how do you go about lacing them?
This blog post will show you how to lace hey dude shoes differently, such as the standard, speed, and loop lacing methods. We hope this article will help you find the perfect way to lace your shoes for maximum comfort and performance.
What Are the Benefits of Lacing Hey Dude Shoes?
- Allows for a customized fit on your foot: Lacing your shoes a certain way can provide added support for your foot and prevent slippage. It also allows you to adjust the tightness or looseness of the shoes to your personal preference.
- Allows for easier on and off: Some lacing methods make it easier to slide your feet in and out of the shoe without having to tie and untie them constantly.
- Improves performance: Properly laced shoes can improve athletic performance by providing better support and stability during physical activity.
- Aesthetics: Lacing your shoes in a unique pattern can add a cool, trendy touch to your overall appearance.
Now that we’ve covered some benefits let’s learn how to lace your Hey Dude shoes.
Why Do You Need to Lace Hey Dude Shoes?
Lacing your shoes is essential for proper functioning and comfort. Without laces, your feet would constantly slip out of the shoes while walking or running, causing discomfort and potential injuries. Additionally, laces help distribute pressure evenly across the shoe, preventing any one part from becoming too tight or loose. This helps prevent blisters and discomfort.
Furthermore, lacing your shoes can also add to the overall aesthetic of the shoe. Different lacing methods can create unique patterns and designs that add a personal touch to your style. The way you lace your shoes can also affect the fit and comfort, so it’s important to learn how to do it properly.
10 Easy Steps on How to Lace Hey Dude Shoes:
Step 1: Threading the Lace
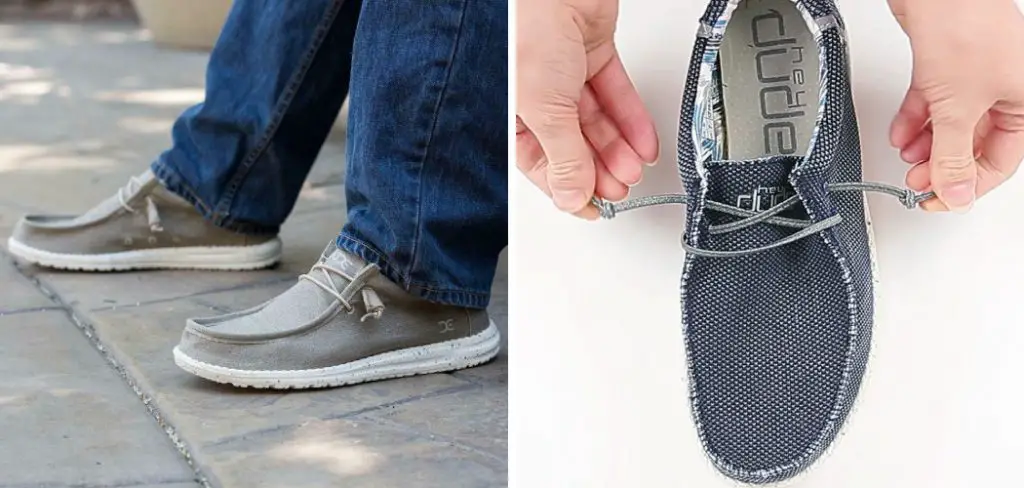
Start by threading the lace through both sides of the shoe’s bottom eyelets. Use one end of the lace for each shoe. Be careful not to twist the lace as you thread it through. Leave a small amount of slack at the end to tie a knot later. You can adjust the tightness of the knot later, so don’t worry about getting it perfect now.
It’s important to note that Hey Dude shoes have a unique lace-up design, with extra eyelets at the top of the shoe for added support. This means you’ll need to thread the lace through all of the eyelets before beginning any lacing method.
Step 2: Criss-cross Lacing
Take the lace on one side and bring it up to the next eyelet, then take the lace on the other side and bring it over and through the same eyelet. Repeat this criss-cross pattern until you reach the top of the shoe. Keep the tension on both laces even for a snug fit. It’s important to keep the laces straight and untwisted as you go.
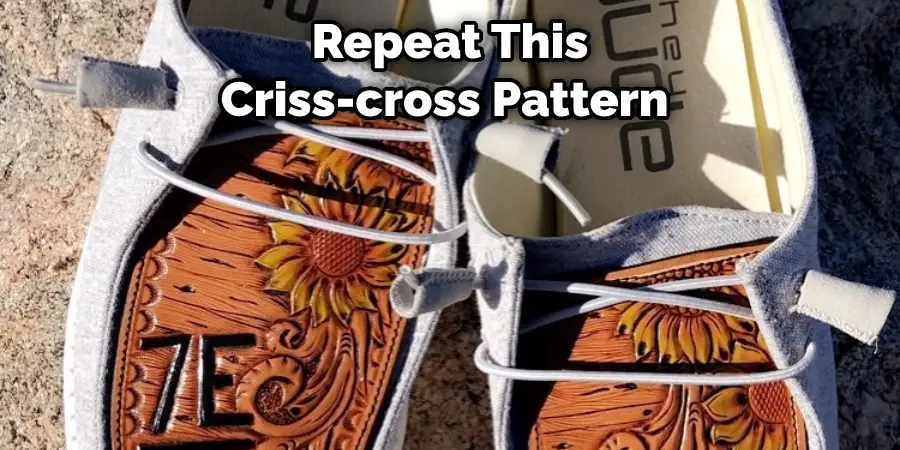
You can also create a different pattern by starting the crisscross at the bottom and working your way up, then crossing them over each other near the top before tying the knot. It’s all about personal preference and finding what looks and feels best for you.
Step 3: Lacing the Top Eyelets
Once you reach the top eyelets, bring both laces to the outside and thread them through the top eyelets on both sides. Don’t pull it too tight just yet. You’ll want some room to adjust in the next step. You can also leave the laces on the inside and thread them through the opposite eyelets for a different look. It’s up to personal preference.
You can also skip this step and use the top eyelets as a way to tie off your laces, creating a more secure and snug fit. The choice is yours. It’s all about finding what works best for you.
Step 4: Creating Loops
Take the laces on one side and create a small loop by bringing it over the top eyelet and then back through to create an “X” shape. Next, do the same on the other side. Be careful not to pull the laces too tight at this point. These loops will be used for the next step. It’s important to make sure both loops are even on both sides for a symmetrical look.
You can also create a larger loop by using more eyelets and crossing the laces over each other multiple times. This will provide added support and stability for your foot.
Step 5: Pulling the Laces Tight
Hold onto both loops created in the previous step and pull them tight to tighten the shoe. This will also secure the loops in place. Ensure the shoes feel comfortable and secure, not too tight or loose. You can also tighten or loosen the tension on the laces near the bottom of the shoe to adjust for added support and comfort.
You can also skip creating the loops and simply tie a standard knot at the top to secure the laces. It’s all about finding what works best for you.
Step 6: Tying the Knot
Tie a normal shoe knot at the top, leaving some extra lace for adjusting later as needed. There are many different styles of shoe knots, but a simple one will do the job just fine. You can also add a small loop or “bunny ear” for added security if desired. Be sure to tie it tight enough for a snug fit but not too tight that it causes discomfort.
It’s important to make sure both shoes are tied evenly and securely for maximum comfort and performance.
Step 7: Trimming the Laces
Trim any excess lace if necessary. Ensure enough extra lace to adjust the shoe’s fit as needed. It is important not to trim too much and leave yourself unable to adjust the tightness later. Also, be sure to use sharp scissors to prevent fraying.
If you prefer longer laces, you can skip this step and simply tuck the extra lace into the shoe or tie a double knot at the top for added security. You can also choose to lace the shoes all the way up to the top eyelets for added support and stability.
Step 8: Add a Bow for Style
If desired, you can add a small bow to the top of your shoe for added style. This is optional and not necessary for the shoe’s function. But it can add a cute touch to your overall look. The type of knot you choose to tie can also add to the aesthetic. Play around with different styles and find what works best for you.
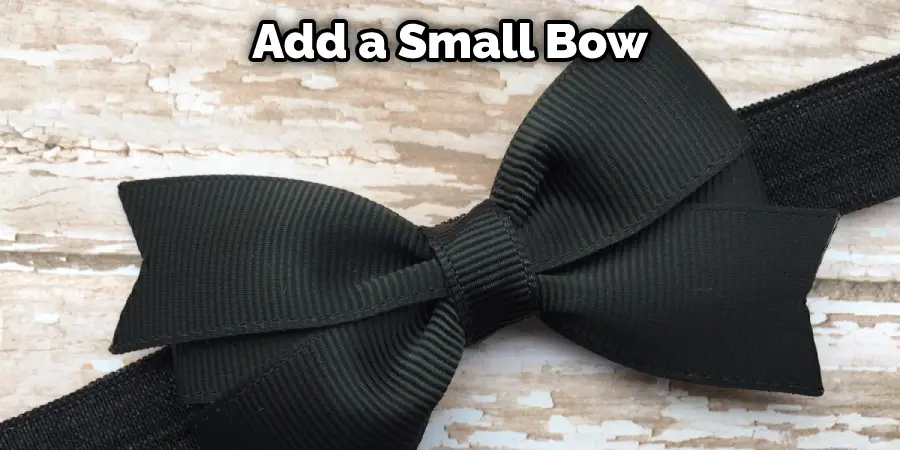
You can also choose to skip this step and leave the laces untied for a more casual and effortless look. it’s all about personal preference and what makes you feel comfortable and stylish.
Step 9: Adjust as Needed
Make any necessary adjustments to the tightness or looseness of the shoe. Use the extra lace to tighten or loosen as needed for maximum comfort. If necessary, you can also re-tie the knot to adjust the fit. It’s important to ensure the shoes feel snug and secure but not too tight that they cause discomfort.
If you find the laces becoming loose throughout the day, consider using a double knot at the top for added security. You can also try different lacing methods for a better fit and feel.
Step 10: Rock Your Hey Dude Shoes
You’re all set to rock your Hey Dude shoes! You can experiment with different lacing methods or try out new styles for added customization and trendiness. Have fun and enjoy the comfort and performance benefits of properly laced shoes. Happy lacing!
Following these steps will ensure a secure and comfortable fit in your Hey Dude shoes. Don’t be afraid to experiment with different lacing patterns to find what works best for you. Now go show off your trendy, properly laced Hey Dude shoes!
Different Ways to Lace Hey Dude Shoes:
1. Standard Lacing:
This is the most common and traditional way to lace shoes. Simply thread the lace through each set of eyelets, starting at the bottom and working your way up to the top. Keep an equal amount of lace on both sides and tie in a standard knot at the top.
2. Straight Bar Lacing:
Thread each lace straight up through alternating sets of eyelets, creating a straight line on either side before tying in a knot at the top. Be careful not to pull the laces too tight while doing so.
3. Ladder Lacing:
Start from the bottom eyelets and thread the lace straight up through one set before crisscrossing over to the next set, creating a ladder pattern on each side before tying in a knot at the top.
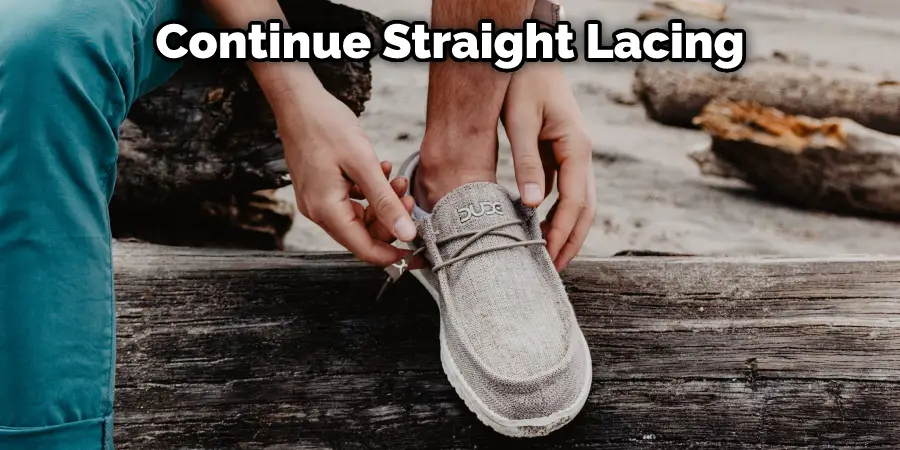
4. Alternating Lacing:
Start with a straight lacing on the bottom two eyelets, then make a criss-cross pattern until you reach the top. Then, continue straight lacing until you reach the top eyelets. Make sure to pull the laces tight as you go.
5. Over Under Lacing:
This popular lacing style creates an alternating pattern outside the shoe. To do this, start at the bottom and lace as normal, but skip one on the second eyelet and go up through the next one. Then, continue to alternate which eyelet you skip until you reach the top.
Feel free to experiment with different lacing patterns for added customization and style in your Hey Dude shoes!
5 Additional Tips and Tricks:
1. To bring a little extra personality to your shoes, try using colored laces instead of traditional white or black.
2. If you want to keep your laces from coming undone, try using a knot or bow at the top instead of just tying them normally.
3. Want to keep your laces from getting tangled? Try using the “criss-cross” method to weave the laces in and out before tying them off.
4. If you have extra long laces, like Hey Dude shoes that have multiple eyelets, try making loops with the excess lace to secure it in place before tying it off at the top.
5. Experiment with different styles of tie-offs, such as a square knot or double knot, to add some variety to your shoe game. Happy lacing!
5 Precautions You Can Take While Lacing Hey Dude Shoes
1. Start by loosening the laces beforehand to make it easier to lace up your shoes.
2. When threading the laces, ensure they go through each hole or eyelet evenly on both sides of the shoe.
3. For a secure fit, cross the laces over one another as you continue to lace up your Hey Dude shoes.
4. Double knot the laces at the top for added security and comfort while wearing them.
5. Trim excess lace length if needed for a clean finish and to prevent tripping hazards.
Following these steps will ensure a proper and comfortable fit with your Hey Dude shoes!
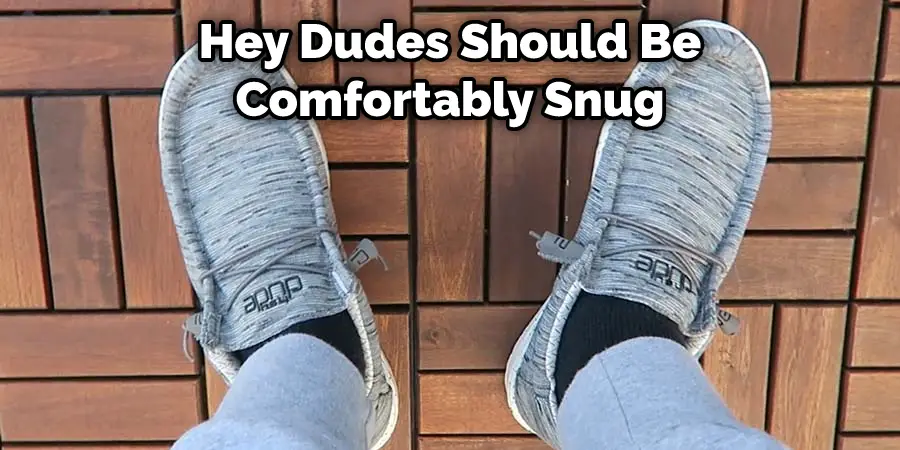
How Tight Should Hey Dudes Be?
Ideally, Hey Dudes should be comfortably snug on your feet without causing discomfort or constriction. To find the perfect fit, try walking around in them and see if there is any slipping or tightness in certain areas. Adjust the laces as needed for a secure yet comfortable fit.
Additionally, ensure that the toe box has enough room for your toes to move comfortably without feeling cramped. Remember to always check in with yourself while wearing Hey Dudes to make sure they feel good on your feet. Happy exploring!
Can You Wear Hey Dudes if You Have Wide Feet?
Absolutely! Hey Dudes offers a variety of width options, including “slouchy,” “relaxed,” and “snug” for those with wider feet. Make sure to check the fit guide on their website before purchasing to find the best option for you.
Additionally, the stretchy material of Hey Dude shoes allows them to mold to your unique foot shape for added comfort and roominess. Happy shopping!
Frequently Asked Questions:
Q: Are Hey Dude Shoes Only for Men?
A: No, Hey Dude offers a wide range of styles and sizes for both men and women. You can find the perfect pair for your feet regardless of gender. You can also check out their website for a size conversion chart if needed. It’s all about finding the right fit for you! It’s important to note that Hey Dude shoes use men’s sizing, so be sure to double-check the size guide before purchasing.
Q: Do I Need to Break in Hey Dude Shoes?
A: No, Hey Dude, shoes are designed to be comfortable straight out of the box. The stretchy material and foam insole allow for a snug and comfortable fit from the start. However, it may take some time to get used to the different lacing methods and fit of Hey Dudes compared to other shoes. The more you wear them, the more comfortable they will become!
Q: Can I Wear Hey Dudes in Water?
A: Hey, Dude, shoes are not designed for water use and may not hold up well if exposed to excessive water. It is best to avoid wearing them in wet conditions. You can, however, spot-clean them with a damp cloth if needed. Always allow them to fully dry before wearing them again. You can also consider purchasing a waterproof spray specifically made for shoes to protect them from water damage.
Q: How Do I Clean My Hey Dude Shoes?
A: Spot cleaning with a damp cloth and mild soap is the best way to clean Hey Dudes. Avoid machine washing or using harsh chemicals, as this can damage the material and affect the fit of your shoes. It’s also important to let your shoes air dry completely before wearing them again. Following these steps will help keep your Hey Dudes looking and feeling fresh!
Q: Can I Replace the Insole of My Hey Dude Shoes?
A: Yes, you can purchase replacement insoles for your Hey Dude shoes if needed. This is a great option for those who need additional support or want to refresh the insole after extended use. Just make sure to choose the correct size and style for your specific Hey Dude shoe model. You are now ready to lace up your Hey Dude shoes and hit the town with comfort and style. Experiment with different lacing patterns, follow our tips and precautions and don’t be afraid to show off your unique sense of style.
Conclusion:
If you follow the steps outlined in this blog post, you’ll be lacing your Hey Dude shoes like a pro in no time! Even if you don’t have Hey Dudes, these tips can apply to any lace-up shoe. So go forth and start lacing those bad boys up!
Now that you know how to lace hey dude shoes, it’s time to show off your new shoes! Be sure to tag us in pictures of you sporting your Hey Dudes so we can see how fly you look. We always love seeing our customers happy and stylish.
Hopefully, these tips and tricks have helped you feel more confident in your shoe game. Happy exploring, and stay stylish! Thanks for reading!