
Are you planning on going for a hike but struggling with tying your hiking boots? Tying a hiking boot may seem simple, but it is important to tie them correctly to avoid discomfort and even injuries while on the trails. Here, we will go through the steps of how to tie a hiking boot.
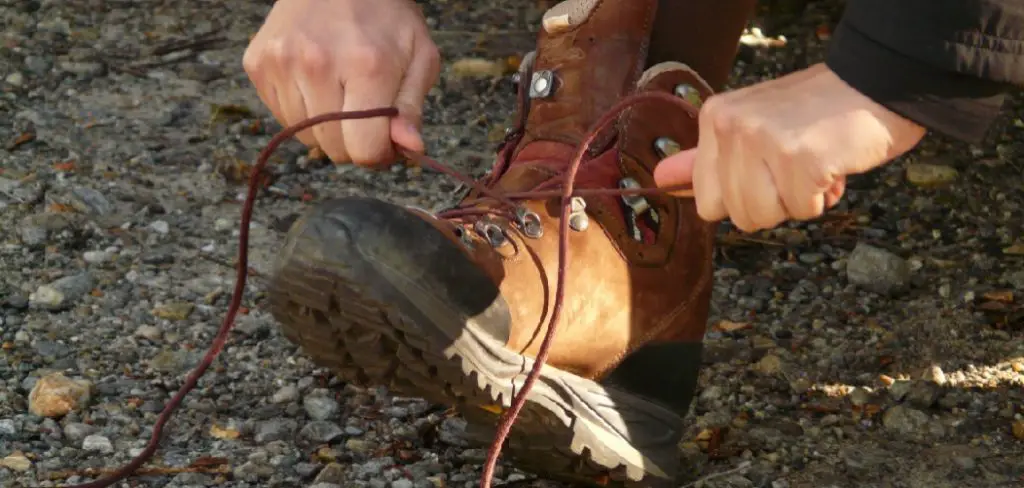
Tying a hiking boot correctly is a fundamental skill for any outdoor enthusiast. Given the varied terrains and the rigorous demands of trails, a properly tied boot can make a significant difference in comfort, performance, and safety. This guide aims to help you master the art of securing your hiking boots to ensure a snug fit, provide adequate support, and prevent blisters or discomfort on your adventures.
Whether you’re tackling a gentle hill or a rugged mountain, understanding how to lace your boots effectively is the first step toward a successful hike.
What are the Benefits of Tying Your Hiking Boots Correctly?
- Better Support and Stability: Tying your hiking boots correctly will support your feet and ankles. This is crucial for navigating uneven terrain, steep inclines, or carrying a heavy backpack.
- Reduced Risk of Blisters and Discomfort: Loose laces can cause friction on your skin, leading to blisters or discomfort. You can minimize movement and prevent hot spots or irritation by tying your boots snugly.
- Prevent Injuries: A properly tied hiking boot will keep your foot in place, reducing the risk of sprains, strains, or other injuries.
- Better Performance on The Trails: Proper lacing techniques can fine-tune the fit of your boots, providing adequate control and responsiveness for different types of terrain.
Now that you know the importance of tying your hiking boots correctly, let’s dive into the steps to do so.
What Will You Need?
Before we start, make sure you have the following items:
- A pair of hiking boots
- Hiking socks
- Laces (make sure they are in good condition)
Once you have all these items, find a comfortable place to sit and follow the steps below.
10 Easy Steps on How to Tie a Hiking Boot:
Step 1: Prepare Your Boots
Start by fully loosening the laces of your hiking boots. This makes it easier to adjust the fitting as you go, ensuring that the boot will comfortably house your foot. After loosening the laces, insert your foot into the boot while wearing the hiking socks you plan to use on your hike. It’s crucial to wear the socks you will hike in, as they can significantly affect the boot’s fit and comfort level.
Step 2: Snugly Fit the Boot to Your Foot
Once your foot is in the boot with your hiking sock on, push your heel back into the boot’s heel cup. This ensures your foot is positioned correctly within the boot, maximizing contact with the insole and minimizing movement that could lead to hot spots or blisters. Begin tightening the laces from the bottom up, making sure each section of the lace is snug but not overly tight. The goal here is to achieve a comfortable fit that securely holds your foot in place, providing support without restricting circulation.
Step 3: Employ the “Surgeon’s Knot” for Added Security
With your boot snugly fit to your foot, it’s now time to add extra security to your lacing, especially at the key flex point of the boot to prevent loosening during your hike. Take the laces in your hands and cross them over, pulling them tight. Then, make a loop with each end, crossing them over each other twice before pulling the ends through the loops you’ve created.
This is known as the “surgeon’s knot.” Pull tight to secure this knot at the base of your ankle to ensure that the lower section of the boot remains snug. This technique is beneficial for maintaining a tight fit around the foot while allowing flexibility and movement in the upper part of the boot.
Step 4: Lace Up to the Top
Continue lacing the boot in your usual method up towards the top, ensuring each lace cross is snug and even. This will help distribute the pressure evenly across the top of your foot, which can reduce discomfort on long hikes. As you lace up towards the ankle and lower leg, adjusting the tightness is helpful based on your comfort and the level of support you need. Some hikers prefer a tighter fit around the ankle for added support, while others opt for a slightly looser fit for more flexibility.
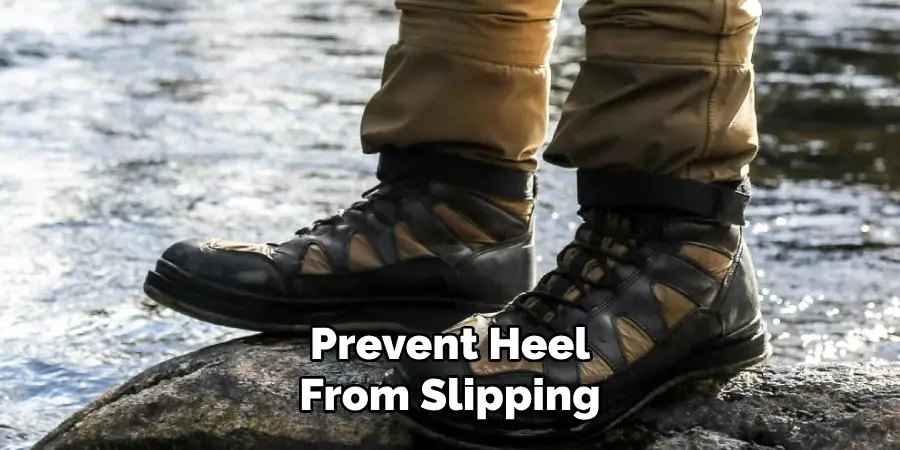
Step 5: Use the Heel Lock or Lace Lock
A common issue hikers face is their heel slipping inside the boot, which can lead to blisters. To prevent this, employ the heel lock or lace lock technique. To do this, locate the two eyelets closest to the top of your foot (just before the boot begins to narrow into the ankle shaft).
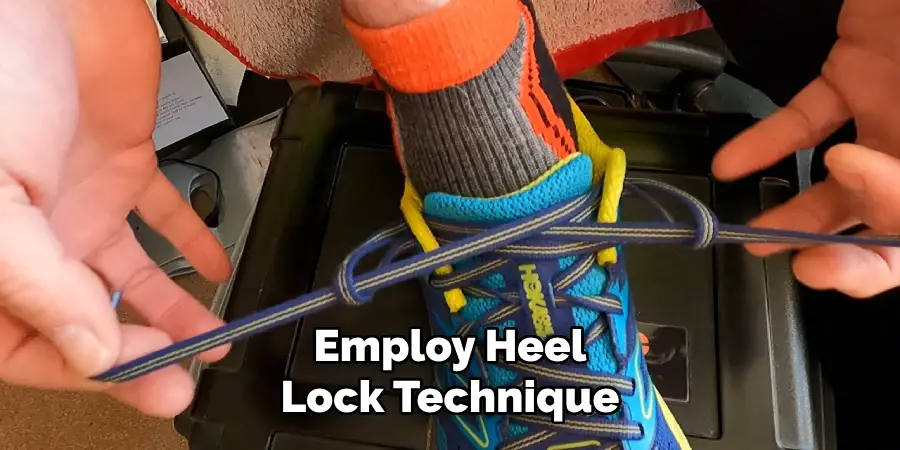
Instead of crossing the laces over, thread each lace through the eyelet directly above it on the same side, creating a loop. Do not pull these too tight yet. Then, cross the laces and thread each through the loop created on the opposite side. Pull the laces tight to secure the heel in place. This technique locks the heel down, preventing slippage and providing a firm foundation for your foot.
Step 6: Double Check the Fit
Before you finish tying your laces, it’s essential to double-check the fit of your boot. Stand up and walk around a bit to ensure there’s no pinching at the toes or slipping at the heel. Your foot should feel secure but not constricted, with enough room to wiggle your toes. Adjust the tightness if necessary, especially around areas that feel too loose or tight. The right fit will stabilize your foot, even on the most challenging terrains.
Step 7: Tie a Strong Bow
After ensuring the fit is perfect and your heel is securely locked in place, you’re ready to tie your boots. Make a strong, secure bow just like you would with any other pair of shoes. However, for hiking boots, you might want to tie a double bow or even a triple bow to ensure that the knot doesn’t come loose during your hike. Double-check the bow to make sure it’s tight and secure. This will minimize the chances of your laces coming undone, which can be both dangerous and inconvenient on the trail.
Step 8: Tuck Away Excess Laces
After your boots are securely tied, you may find that the laces are longer than necessary, posing a tripping hazard. To handle excess, tuck the remaining length of the lace into the sides of your boots or around the tied bow itself. Some boots have a small hook or loop near the tongue for tucking extra lace away. This keeps them out of the way and ensures your hike remains safe and uninterrupted by loose laces. Keeping your laces neat and managed prevents them from catching on underbrush or protruding elements on the trail, which could cause unexpected stops or falls.
Step 9: Test Your Boot’s Fit on Varied Terrain
Before heading out on your hike, it’s wise to test the fit of your newly tied boots on various surfaces if possible. Walk on flat surfaces, uphill, and downhill. Pay attention to any slippage of the heel or pressure points that may become uncomfortable over long distances. Adjust your lacing as needed to ensure the best possible fit for the expected hiking conditions. This step can significantly improve your comfort and performance on the trail.
Step 10: Final Adjustments Before the Trail
You might need to make some final adjustments after walking around and testing your boots on different terrains. It’s not uncommon to find certain areas that might benefit from a slight tightening or loosening. Remember, the goal is to have a snug, comfortable fit that supports your foot without causing any discomfort. Once you’re satisfied with the fit, you’re ready to confidently hit the trail, knowing your boots are perfectly laced for the adventure ahead.

By mastering these steps for tying a hiking boot, you ensure the foundational aspect of your hiking gear is optimized for performance, safety, and comfort. Properly tied boots can transform your hiking experience, allowing you to enjoy the beauty and exhilaration of the great outdoors without being held back by foot discomfort or injuries.
5 Additional Tips and Tricks
- Employ the Window Lacing Technique: This method relieves pressure points on the top of your foot. Simply skip crossing the laces over one or two sets of eyelets where you feel too much pressure; instead, thread the laces up the sides. This creates a “window” or “gap” which reduces pressure.
- Double Back for High Arches: If you have high arches, you might find that standard lacing doesn’t provide enough support. To counter this, try doubling back the laces. Once you’ve laced halfway up the boot, take each lace back down one eyelet and then continue lacing upwards. This adds extra tightness where you need support.
- Use Stronger Knots: A simple bow knot might not be the best choice for hiking as it can come loose easily. Instead, finish off your lacing with a surgeon’s knot before tying the final bow. This involves wrapping the lace around twice before pulling it tight, creating a more secure knot that’s less likely to come undone.
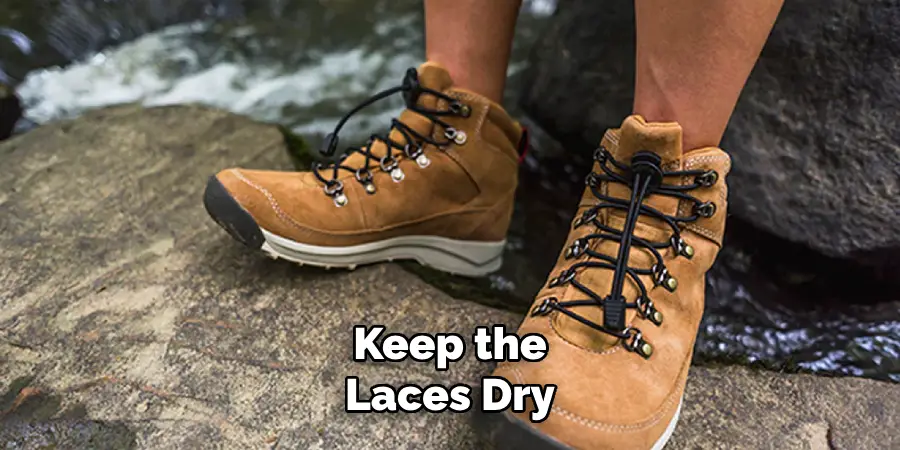
- Keep the Laces Dry: Wet laces can stretch and come loose, undoing even the best lacing techniques. If you’re hiking in wet conditions, consider treating your laces with a water repellent or simply carry a spare set of dry laces. You can also tie a small overhand knot at different intervals of your lace to prevent slippage if they do get wet.
- Add Some Cushioning: Thin laces can dig into the top of your foot, causing discomfort or even bruising. To prevent this, try adding some cushioning under the laces where they come into contact with your skin. A small piece of folded moleskin or a band-aid can provide just enough padding to alleviate any pressure points. This is especially helpful for those with sensitive or bony feet.
These additional tips and tricks can make all the difference when it comes to tying your hiking boots comfortably and securely.
5 Things You Should Avoid
- Don’t Ignore the Top Hooks: Many hikers skip using the top hooks of their boots, thinking it’s unnecessary. However, these hooks are designed to secure your ankle and provide additional support. Skipping them can lead to less stability and an increased risk of ankle injuries.
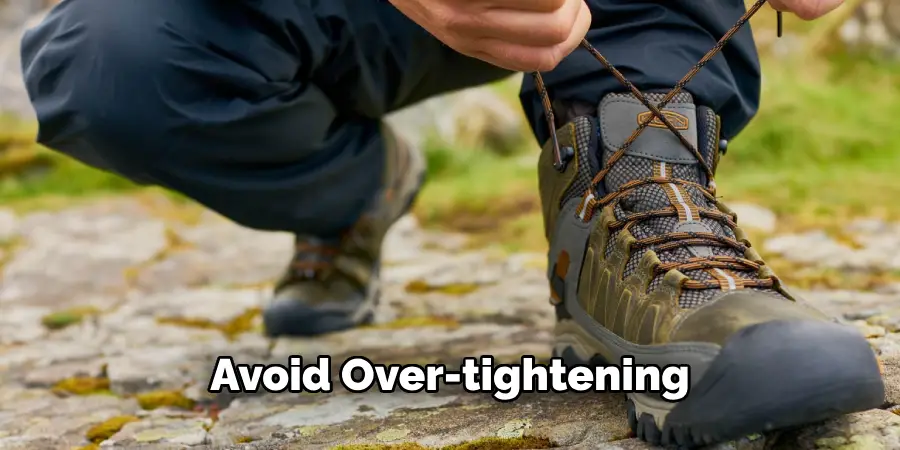
- Avoid Over-Tightening: While ensuring your boots are snug is important, over-tightening can restrict blood flow and cause numbness in your toes. Finding the balance between tight enough to prevent slipping and loose enough to allow circulation is crucial.
- Steer Clear of Uneven Lacing: Equal pressure distribution is key when lacing your boots. Uneven lacing can cause discomfort and lead to blisters. Ensure each cross of the lace exerts similar tension across the foot.
- Don’t Use Worn-Out Laces: Worn-out or frayed laces are more likely to snap during a hike. Regularly inspect and replace your boot laces to avoid unexpected surprises on the trail.
- Avoid Short Laces: Using laces that are too short can prevent you from employing secure tying techniques, such as the surgeon’s knot. Ensure your laces are long enough to comfortably tie and secure your boots without stretching them to their limits.
Avoiding these common mistakes can greatly improve your hiking experience by ensuring your boots are properly secured, comfortable, and supportive throughout your adventure.
5 Different Style Lacing Techniques
- Ladder Lacing: This lacing technique involves crisscrossing the laces through every set of eyelets, creating a “ladder” effect. It’s great for those with high arches, allowing for more adjustability and support.
- Loop Lacing: Loop lacing is similar to ladder lacing but involves threading the lace straight across instead of crisscrossing. This creates loops that can be easily adjusted for a customized fit.
- Over-Under Lacing: This unique lacing technique involves weaving the laces over and under each other in a diagonal pattern, providing extra stability and support.
- Straight Bar Lacing: This method is great for those with wider feet as it creates a straight bar across the top of the foot, preventing discomfort from tight lacing.
- Zipper Lacing: This style mimics the look of a zipper, providing quick and easy tightening and loosening options. It’s also great for those with limited hand dexterity.
These different lacing techniques can help you find the perfect fit and support for your feet, no matter their shape or size. Experiment with different styles to find the one that works best for you!
How to Tie Hiking Boots to Prevent Heel Slippage?
One of the most common problems hikers face is heel slippage, which can cause discomfort and blisters. Here’s a simple lacing technique to prevent heel slippage:
- Start by threading the laces through the bottom eyelets as usual.
- Instead of crossing the laces over at the top, thread them straight up through the next set of eyelets.
- Bring the laces around to the back of your ankle, crisscrossing them and threading them through the top eyelets.
- Finally, bring the laces back down to the bottom eyelets and tie them as usual.
This technique creates a “lock” at the top of your boot, preventing your heel from slipping out while still allowing for comfortable movement and circulation.
With these tips and techniques, you can confidently lace up your hiking boots for a comfortable and supported adventure on the trails.
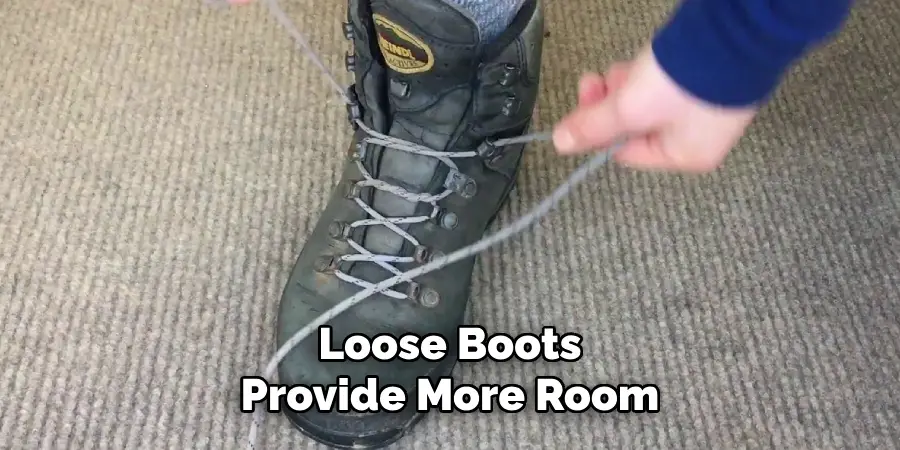
Is It Better to Have Loose or Tight Hiking Boots?
When it comes to hiking, finding the right fit for your boots is crucial. Loose and tight boots can negatively affect your feet and overall experience. Here are some things to consider:
- Loose Hiking Boots: Loose boots provide more room for your feet to move and breathe, reducing the risk of blisters and discomfort. However, they may not provide enough support and stability, leading to potential ankle injuries or fatigue.
- Tight Hiking Boots: Tight boots can be uncomfortable and restrict blood flow, causing numbness in your toes. However, they provide more support and stability, reducing the risk of ankle injuries. Just be sure not to overtighten them.
Ultimately, finding a balance between snug and loose is important, where your boots are secure enough to prevent slipping but not tight enough to cause discomfort.
Conclusion
In conclusion, how to tie a hiking boot is essential for a comfortable and safe trekking experience. By adopting the right lacing techniques and avoiding common pitfalls, hikers can significantly enhance the fit and support of their boots.
Whether you prefer the secure grip of ladder lacing or the quick adjustability of zipper lacing, tailoring the fit to your feet’s unique shape and needs is crucial. Remember, the goal is to strike a perfect balance between snugness and comfort, ensuring stability without compromising circulation or causing discomfort.
Use these tips and tricks to prepare your footwear for any adventure that lies ahead, and enjoy the confidence that comes with well-laced hiking boots.