Are you tired of buying either too big or too small shoes? Do you need help with your shoe size and want to ensure you get the perfect fit every time? Look no further!
When purchasing the perfect pair of shoes, understanding how to read a shoe sizer accurately is essential. A shoe sizer is a tool designed to measure both the length and width of your feet, helping you determine the appropriate shoe size for optimal comfort and fit. With variations in sizing across different brands and countries, knowing how to use a shoe sizer can save you time and ensure you make well-informed decisions.
This guide will walk you through how to read shoe sizer, providing clear instructions and tips to help you navigate shoe sizing with confidence.

What Will You Need?
Before you begin, there are a few essential items you will need to read the shoe sizer accurately:
- A printer
- A piece of paper
- Scissors
- A ruler or tape measure
Once you have these items ready, you are ready to measure your feet and find the perfect shoe size.
10 Easy Steps on How to Read Shoe Sizer
Step 1: Print the Shoe Sizer
Start by finding a reliable shoe sizer template online, ensuring it is appropriate for your region’s sizing standards (e.g., US, UK, EU). Download the template and print it on a standard A4 or letter-sized paper. Make sure your printer settings are adjusted to scale at 100%, without any resizing, to ensure accuracy. Verify the test measurement line typically included on the sizer to confirm the correct scale. This will serve as a precise baseline for correctly measuring your foot’s length and width, setting the groundwork for an accurate shoe-fitting process.
Step 2: Prepare the Printed Template
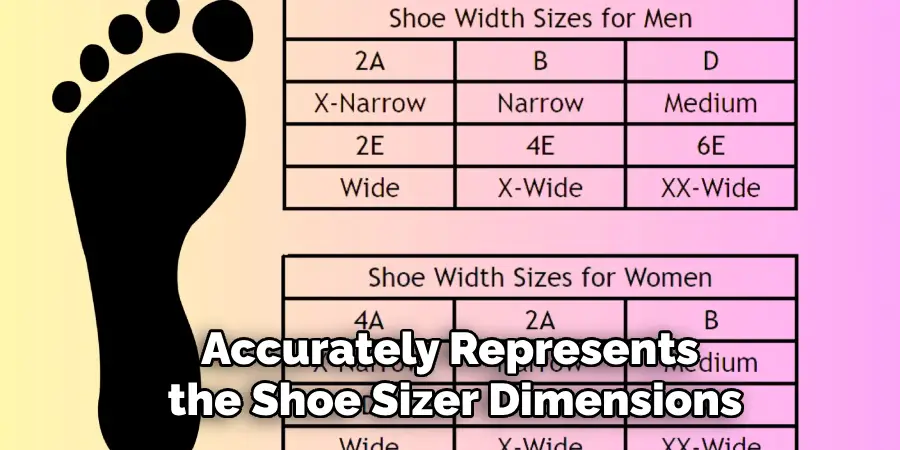
With the shoe sizer template freshly printed, it’s time to ensure it is ready for use. Carefully cut around the edges of the template using scissors, following any dotted lines provided, so that the template lies flatly and accurately represents the shoe sizer dimensions. If the template includes a detachable portion for width measurement, ensure it is separated as guided.
The template should be placed on a hard, flat surface like a tiled floor or table to prevent distortion from uneven surfaces. To further prevent movements during measurement, consider taping down the corners of the template with scotch tape. This step is crucial for maintaining accuracy in the subsequent steps. Once your template is prepared and secured, you are ready to begin the process of measuring your feet to determine your ideal shoe size.
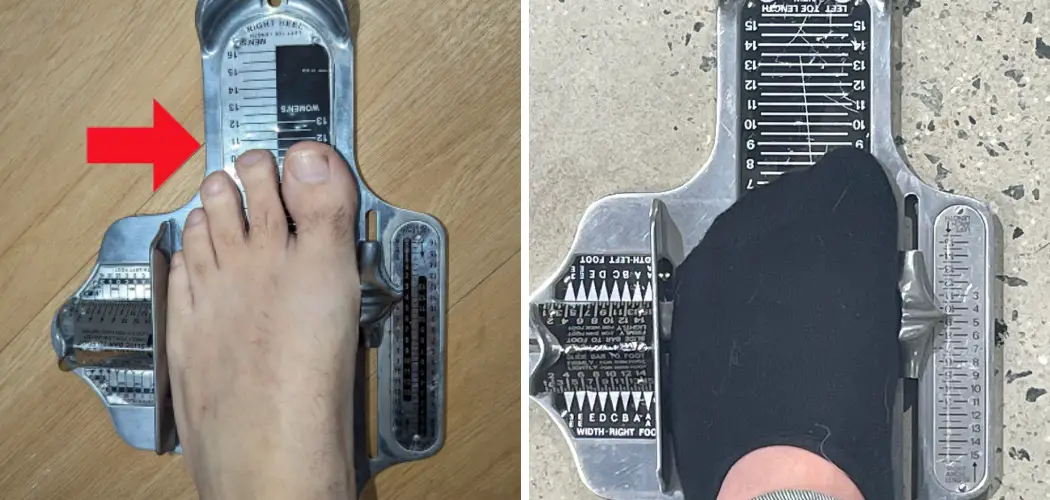
Step 3: Position Your Foot on the Template
Stand on the prepared shoe sizer template with one foot, ensuring your heel aligns with the designated heel line on the template. Standing upright and distributing your weight evenly on both feet is vital, as this will yield the most accurate results. To ensure precision, having someone assist you during this step might be helpful. This assistance can help balance or confirm that your foot is correctly positioned.
Remember, any deviation from the heel line could cause inaccuracies in measuring, so take the time to adjust your foot until it’s perfectly placed. Once accurately positioned, you are ready to mark the longest point of your foot.
Step 4: Mark the Longest Point
With your foot correctly positioned on the template, use a pencil to mark the longest point of your foot lightly, typically found at the tip of your longest toe. It’s essential to ensure this mark is clearly visible to facilitate accurate measurement. If you’re uncertain which toe is the longest, double-check by visually comparing your toes’ alignment on the template.
Remember to keep your foot steady until you complete the marking to prevent any shifts that might affect the precision of the outline. Once you’ve marked the length, repeat the process with your other foot, as one foot can often be slightly larger than the other.
Step 5: Measure the Length
Remove your foot from the template and grab a ruler or tape measure. Accurately measure the distance from the heel line to the mark you made at the tip of your longest toe. Ensure you measure in a straight line following the length axis of the template. The measurement should be recorded in either centimeters or inches, depending on your preferred unit of measurement or the shoe sizing system in your region.
This length measurement will serve as a reference when checking size charts provided by shoe manufacturers. Repeat this measurement process for your other foot to account for size differences between the two. These precise measurements will guide you in choosing shoes that offer the best fitting length, reducing the hassle of returns and discomfort.

Step 6: Mark the Width
While your foot is still on the template, it’s time to measure the width for a perfect fit. Using a pencil, draw a mark on both the widest points of the foot, usually located at the ball of the foot. As with length, precision is crucial, so ensure these markings align accurately with the edges of your foot when standing usually. If the template provides a width guide, use it to identify and note the corresponding width measurement.
Repeat this process for your other foot since the width can also vary between feet. Having both the length and width data guarantees a more overall comfortable fit, allowing you to select shoes that accommodate your foot shape accurately.
Step 7: Measure the Width
To measure the width of your foot accurately, remove your foot from the template and use a ruler or tape measure to measure the distance between the two marks you made on the broadest part of your foot. Record the width in the same unit as your length measurement.
This dimension will help you in selecting the correct shoe width, whether it’s narrow, regular, or wide. Repeat the width measurement for the other foot, as the width can vary between feet. With both length and width measurements, you will have a comprehensive understanding of your foot’s dimensions, enabling you to refer to size charts and confidently ensure a well-fitting shoe.

Step 8: Compare Measurements with Size Charts
Now that you have both the length and width measurements for each foot, it’s time to compare these dimensions against size charts provided by shoe manufacturers. Sizing may vary between brands, so it’s crucial to consult the specific chart for the brand you intend to purchase. When comparing sizes, remember the more extensive measurements if one foot is longer or more comprehensive than the other, as selecting a size that accommodates your larger foot will ensure overall comfort.
Look for any notes on the size chart regarding fit, such as suggestions for half sizes or additional width offerings. By accurately matching your measurements with the size chart, you can confidently determine the shoe size that will best fit your feet, enhancing comfort and reducing the likelihood of returns.
Step 9: Consider Additional Factors
In addition to comparing your measurements with size charts, you must consider other factors that can affect shoe fit. These may include the type of socks you plan to wear, any personal foot irregularities like bunions or high arches, and the specific activities you’ll be using the shoes. For instance, athletic shoes might require a different fit than casual or dress footwear. Additionally, try to shop for shoes in the afternoon or evening, as feet naturally expand throughout the day.
Step 10: Try on the Shoes
Once you have selected shoes based on your measurements and other factors, it’s essential to try them on to ensure the best possible fit. When trying on shoes, wear the socks you plan to use regularly with them, as this can affect how the boots fit. Stand up and walk around for a while to judge comfort. Pay attention to any tightness, slipping, or discomfort around the toes, heel, and arch.
Also, ensure there’s enough space between your longest toe and the front of the shoe—typically about a thumb’s width. If the shoes don’t feel right, try a different size or style. The goal is to find shoes that provide support, stability, and comfort throughout daily activities.
By following these steps, you can confidently determine your shoe size and select footwear that offers a comfortable fit, allowing you to walk easily and style. Remember to regularly measure your feet as they can change over time due to weight gain or loss, pregnancy, or aging.

Conclusion
Reading a shoe sizer accurately is essential for selecting footwear that offers comfort and support.
By following the outlined steps on how to read shoe sizer, you ensure precise measurements for each foot’s length and width, considering any individual nuances in foot size or shape. Comparing these measurements to manufacturers’ specific shoe size charts is critical, as sizing can differ significantly between brands. Additionally, understanding the role of sock thickness, time of day, and any personal foot conditions further enhances your ability to choose the correct shoe size.
Ultimately, investing time in adequately using a shoe sizer and considering all relevant factors will pay off in a fit that promotes foot health and comfort, allowing you to stride confidently through your day.