
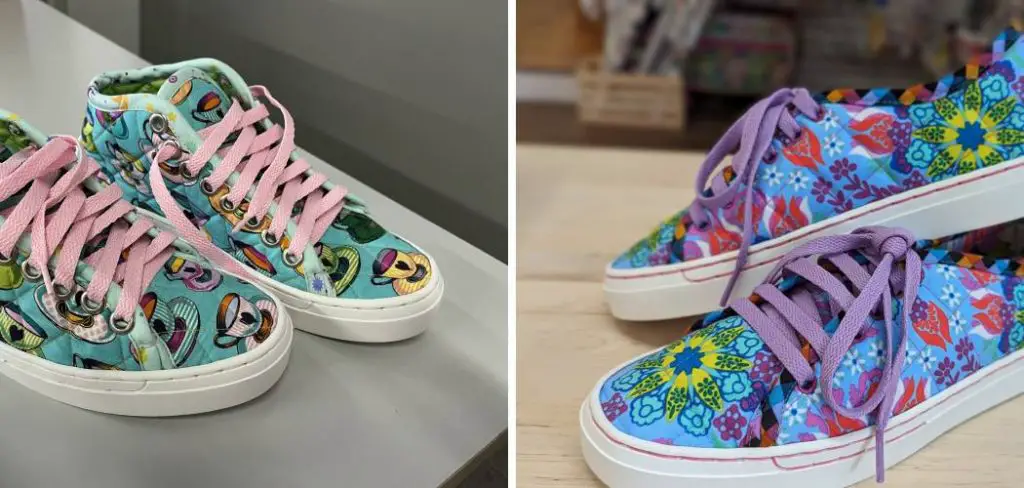
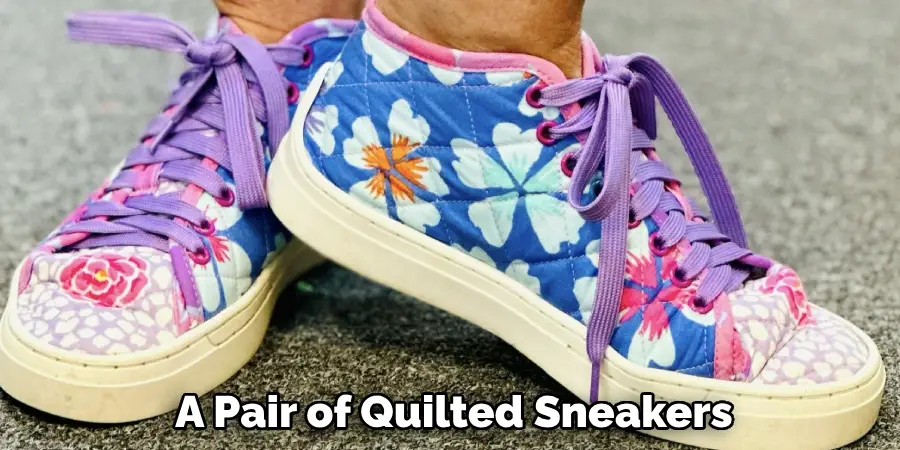
Quilted sneakers are a trendy and stylish way to personalize your footwear. Combining comfort with creativity, this DIY project allows you to incorporate your favorite fabrics and patterns into a unique shoe design. Whether you’re an experienced crafter or just looking to try something new, making quilted sneakers offers a fun and rewarding experience.
In this guide on how to make quilted sneakers, we’ll walk you through the steps of creating your own pair of quilted sneakers, detailing the materials needed and providing tips to ensure your final product stands out. Get ready to transform a simple pair of sneakers into a fashionable statement piece that reflects your personality and flair.
What is Quilting?
Quilting is a time-honored craft that involves sewing together multiple layers of fabric to create a padded material, often resulting in intricate patterns and designs. Traditionally used to make quilts and blankets, this technique utilizes a combination of different textiles, textures, and colors to craft a cohesive and visually appealing piece. Quilting typically involves three main components: the top fabric layer, the insulating padding or batting in the middle, and the backing fabric.
The quilting stitches, which can be either decorative or functional, bind these layers together and enhance the overall aesthetic of the final product. Quilting has evolved beyond its utilitarian roots, becoming a popular form of artistic expression that can be applied to various projects, such as clothing, accessories, and home decor items like quilted sneakers.
Materials Needed
To make your own quilted sneakers, you will need the following materials:
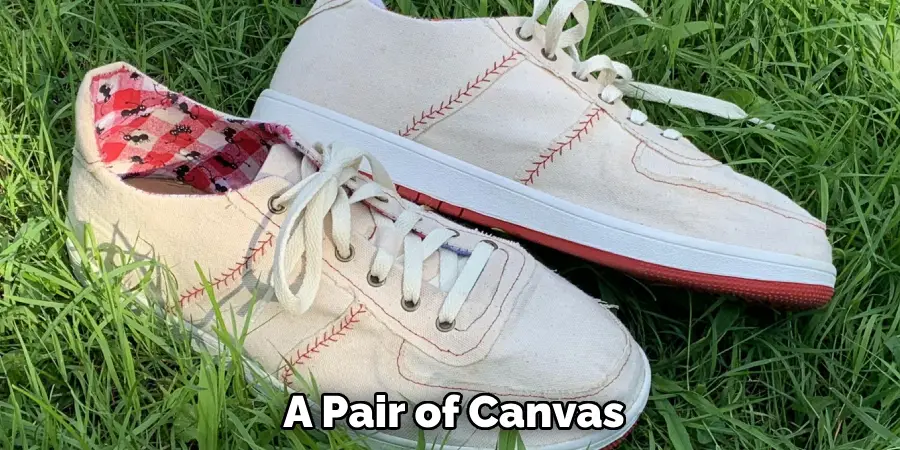
- A Pair of Canvas or Fabric Sneakers (Preferably in a Light Color)
- Quilting Fabric of Your Choice (Cotton is Recommended for Its Durability and Ease of Sewing)
- Fusible Fleece or Batting for Added Padding
- Ruler, Rotary Cutter, and Cutting Mat (Optional but Helpful)
- Fabric Scissors
- Sewing Machine or Needle and Thread
- Iron and Ironing Board
- Pins or Sewing Clips
- Fabric Markers or Chalk for Tracing
8 Step-by-step Guidelines on How to Make Quilted Sneakers
Step 1: Prepare Your Sneakers
Begin by selecting a pair of canvas or fabric sneakers in a light color, as this will provide a neutral base and allow your quilted patterns to stand out. Before starting, ensure your sneakers are clean and dry, removing any dirt or debris that could compromise the fabric’s adherence.
You may also want to remove the laces to make the process easier and avoid any interference while applying the quilting. Once your sneakers are ready, use fabric markers or chalk to lightly outline the areas you intend to cover. This will serve as a guide, helping you visualize the final design and distribute your fabric evenly across the shoe surface.
Step 2: Cut and Iron Your Fabric
Next, select your quilting fabric and cut it into pieces that are slightly larger than the areas you outlined on your sneakers. This will allow for any shrinkage or inaccuracy during sewing. You can use a ruler, rotary cutter, and cutting mat to ensure precise cuts, but scissors will also work fine.
After cutting out your fabric pieces, iron them to remove any wrinkles and create a smooth surface for adhering. Depending on your preference, you can also iron fusible fleece or batting onto the back of each piece to add extra padding and structure to your quilted design.
Step 3: Sew Your Quilted Pieces Together
Using a sewing machine or needle and thread, stitch your fabric pieces together in the desired pattern. This can be as simple as joining squares or rectangles, or you can experiment with different shapes and angles for a more unique design.
Ensure that your stitches are secure and evenly spaced to avoid any bunching or sagging when applied to the sneakers. You can also use decorative stitches for a more intricate and eye-catching look.

Step 4: Trim the Excess Fabric
Once you have stitched your quilted pieces together, it’s time to trim any excess fabric. Carefully lay the sewn quilted panel over the sneaker, aligning it with the outlined areas you marked earlier. Use fabric scissors to trim the fabric according to the shape and size of each section of the sneaker, ensuring a neat edge and a precise fit.
Be cautious while trimming to avoid cutting too close to the stitches, as this may cause the fabric to fray or pull apart. By trimming the excess fabric, you can ensure that your quilted design adheres cleanly to the sneaker, allowing for an even and professional-looking application.
Step 5: Adhere the Quilted Pieces to Your Sneakers
Now that your quilted pieces are trimmed and ready, it’s time to adhere them to your sneakers using an iron. Start by placing a piece of fusible webbing between the fabric and the sneaker surface, then use a hot iron to press firmly for about 10-15 seconds. This will activate the adhesive, fusing the two materials together.
Work section by section, gradually adhering and smoothing out any bubbles or wrinkles as you go. Be sure to apply sufficient heat and pressure for a secure bond that will withstand regular wear and tear.
Step 6: Sew Around the Edges
For added durability and a cleaner finish, you can opt to sew around the edges of your quilted pieces after adhering them. This will help secure the fabric in place and prevent any fraying or lifting over time.
Using a sewing machine or needle and thread, carefully sew along the perimeter of each section, making sure to catch both the fabric and sneaker surface with your stitches. You can use a coordinating or contrasting thread color for an extra pop of detail.
Step 7: Re-lace Your Sneakers
Once your quilted design is fully applied, re-lace your sneakers and tie them up as desired. You can also add decorative laces or embellishments for a more personalized touch.
Congratulations, you have successfully created your own quilted sneakers! You can now style them to match any outfit and showcase your unique crafting skills.
Step 8: Care for Your Quilted Sneakers
To keep your quilted sneakers in good condition, avoid machine washing and instead spot clean them with a damp cloth if necessary. If using fusible fleece or batting, be mindful not to iron over these areas directly to prevent melting or damage. With proper care, your quilted sneakers will make a stylish statement for years to come.

Following these simple steps on how to make quilted sneakers, you can create one-of-a-kind quilted sneakers that showcase your personal style and creativity. Experiment with different fabrics, patterns, and techniques to make each pair unique and truly reflect your individuality. Quilting is a versatile and fun way to elevate everyday items, so why not give it a try? The possibilities are endless! Happy crafting!
How Much Will It Cost?
Creating your own quilted sneakers can be an affordable and rewarding project, but the total cost will depend on several factors, including the quality and quantity of materials used. Here’s a breakdown to help you estimate the expenses:
1. Sneakers
Choose a basic pair of canvas or fabric sneakers, which can range from $20 to $50, depending on the brand and design.
2. Quilting Fabric
Prices vary greatly but typically range from $5 to $15 per yard. Depending on your design, you might need 1 to 2 yards of fabric.
3. Fusible Webbing and Fleece
A few yards of fusible webbing usually cost around $3 to $10, while fusible fleece or batting can range from $5 to $10 per yard.
4. Thread and Other Sewing Supplies
Basic thread and sewing supplies like needles or pins may add another $5 to $10, although you might already have these on hand.
5. Optional Embellishments
Decorative laces, patches, or other embellishments can augment costs by an additional $5 to $15, depending on the extent of personalization.
In total, making quilted sneakers yourself might cost between $40 and $100 or more if using premium materials. However, the unique style and personalization you achieve make it a valuable investment, turning a simple pair of sneakers into a true fashion statement.
Frequently Asked Questions
Q1: Can I Use Any Type of Fabric for Quilted Sneakers?
A: Yes, you can use a variety of fabrics such as cotton, linen, flannel, or even denim for quilted sneakers. Just make sure they are not too thick or stiff to prevent them from adhering smoothly onto the sneaker surface.
Q2: Do I Need a Sewing Machine to Make Quilted Sneakers?
A: No, you can hand-sew your quilted pieces together if you don’t have a sewing machine. However, using a sewing machine will make the process faster and more efficient.
Q3: How Long Will It Take to Make Quilted Sneakers?
A: The time it takes to make quilted sneakers will depend on your skill level and the complexity of your design. Generally, it can take anywhere from 1-3 hours to complete a pair of quilted sneakers.
Q4: Can I Wash My Quilted Sneakers?
A: Machine washing quilted sneakers is not recommended as this can damage the adhesive and fabric. Spot cleaning with a damp cloth is the best way to care for them.
Conclusion
Quilting is a versatile technique that adds texture, color, and personality to everyday items like fabric sneakers. By following these step-by-step guidelines on how to make quilted sneakers, you can create your own one-of-a-kind quilted sneakers and show off your unique style.
Don’t be afraid to experiment with different fabrics, patterns, and techniques to make your quilted sneakers truly your own. Have fun and happy crafting!